Feeds:
Posts
Comments

Posts Tagged ‘Baking’

For many years my parents neighbor would bring these delicious cookies over for a treat.  It took me years to think to ask for the recipe.  I am so happy I finally did!  I  love these cookies because they are chewy and spicy.  So much fun.  Not to mention they are very easy to make and always a crowd pleaser.

Here is what you need:

  • 3/4 of a cup of butter
  • 1 cup sugar
  • 2 eggs
  • 1/2 cup Molasses
  • 2 teaspoons vinegar
  • 3 and 3/4 cups flour
  • 1 and 1/2 teaspoons baking soda
  • 4 rounded teaspoons ginger
  • 1 teaspoon cinnamon
  • 1/2 teaspoon nutmeg
  • 1/2 teaspoon cloves
  • 2 teaspoons crystalized

Cream together butter and sugar mixed in beaten eggs, molasses and vinegar.  Next combine flour, baking soda and spices (including crystalized ginger) 

Tip: Spray your measuring cup with cooking spray prior to measuring molasses.  This will prevent your molasses from sticking to the measuring cup and you from talking to inanimate objects!  You know you do that sometimes too!

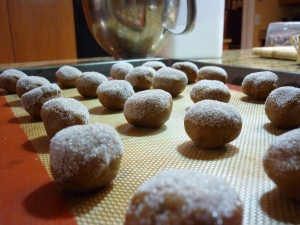
After everything is mixed together, chill the dough for about 30 minutes.  Roll dough into 1 inch balls and cover in sugar. 

Snow capped cookies!

Place on baking sheet and cook for 8-10 minutes at 350 degrees.  Allow to cool and enjoy!

Chewy goodness

Chewy goodness


These make excellent treats for friends and neighbors!  Or pair them with my new favorite libation—Harpoon Winter Warmer!

Cheers to winter!

Happy Holidays!

[L]

Read Full Post »

I did it. I made my sister and (now) brother in-laws wedding cake (two months ago now!). I am both pleased and surprised to say that I didn’t run into too many issues! That can probably be attributed to beginners luck, a healthy dose of research, and the fact that I kept the cake very simple. As I mentioned in the post about Catherine’s bridal shower, I made a practice cake. This helped me work out a few issues related to the frosting and give me the confidence to succeed on the wedding day! Without further ado here is some of my documentation of the process….

I under estimated how busy we would all be before the wedding–dropping wedding favors off, picking up THE wedding dress, entertaining family and just enjoying the festivities. Here is what my timeline looked like:

Thursday:

  •  Grocery shop
  • Bake cakes, two 10X2 inch and 1 8 X 3 inch
  •  Refrigerate overnight

 Friday:

  • Make Swiss butter cream frosting
  • Frost and stack cakes
  • Cover with fondant
  • Pick up flowers from florist

Saturday AM:

  • Place flowers on top of cake
  • Deliver cake to wedding reception venue
  • Get ready for the wedding!

I used this recipe to make a coconut cake. This makes a very decadent and moist cake. It was to die for, if I do say so myself. I had to double the recipe in order to make enough cake. Let me tell you, I think I ended up using almost every bowl in my parent’s kitchen—I was shocked how much batter it took!

Line your cake pan with parchment paper as well as cooking spray. This way you can be 100% sure you will have easy removal from the pan. When pouring batter into the pans I just eye balled the proportions, trying to make sure that I put even amounts of batter in each of the layers. Once you pour the batter in, give the pan a good shake to and allow the batter to settle a bit, this will reduce the dome on the top of the cake during the baking process.

Once the cake is done cooking, allow to cook in the pan for a bit and then place on a cooling rack. Once completely cool wrap each cake in wax paper as well as plastic wrap. This will ensure that as the cake rests and completely cools over night in the refrigerator it will not dry out or smell like your refrigerator! Making the cakes a day before is key. The next day the cake will be much more solid, making it easier to handle during the frosting and stacking process. You can even make it up to 2 weeks in advance and freeze it.

 Making the Frosting: I used Smitten Kitchens recipe for Swiss buttercream frosting. Originally, I wanted to steer clear of buttercream frosting because I just don’t usually like it. But from the research I did it seemed to be the best option. Let’s just say I never looked back. Once you make the frosting give it a few minutes to chill but not too long or else it gets too hard and incredibly difficult to spread. Although I was using fondant, I learned through research that it is imperative to have a layer of frosting between the cake and the fondant; it acts as a dressing for the cake. The beauty of this is you don’t have to be too concerned what the frosting layer looks like. Just make sure it is fairly smooth.

If Swiss buttercream is wrong, I don't want to be right.

Rolling the fondant:  Two pieces of cake baking equipment I purchase were a fondant roller and a fondant mat. I would not have been able to make the cake without these. The mat has both circles and graph paper design on it, allowing you ensure that you have rolled out enough fondant. The mat also helps when transferring the fondant to the cake. You can easily flip your freshly rolled out fondant on top of the cake, slowly peel back that mat and smooth the fondant over the cake. Cut off excess fondant. Repeat for each tier of your cake.

PLEASE WORK!

Proud Mama

Lookin' fine

Stacking: Break a thin wooden dowel into pieces, just as tall as the cake itself and hammer them into the center. This will prevent the top layer from caving into the bottom layer. It seemed a bit silly to me but after lifting this cake multiple times I learned just how heavy a cake can get. Once you place you layers on top of each other use your frosting to make decorative designs to cover the seam. I chose to color the frosting purple and orange-the wedding colors. I then alternated purple and orange frosting stars.

Placing wooden dowels

Structural Support

No more seams!

 Allow your cake the chill over night in the refrigerator. In the morning before delivering your cake cut and place flowers on the top of the cake. Carefully drive the cake to the ending location and refrigerator. I must say it was lots of fun to do this. A bit stressful at times but in the end seeing my sister and her husband cut into a cake that I made was  a cool experience.

Love

I also made sure to jump in for a  photo opp! (Thanks Lisa!) Congratulations Catherine and Andrew!

Just had to jump in!

[L]

Read Full Post »

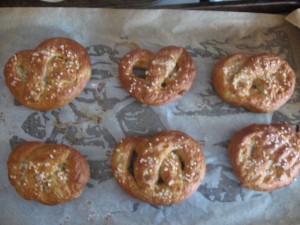
Soft Pretzels

On a recent trip to NYC my cousin proclaimed that she had to have a pretzel from a street vendor.  I encouraged her to go for it,  knowing that I would be able to sample it for myself.  I had forgotten just how good soft pretzels taste.  That was it. I decided I would have to try making these on my own.  After taking a few weeks to read different recipes, I decided to use one that took a classic approach; boiling the pretzels before cooking them in the oven.

I used this recipe, Another Martha Stewart recipe, I just can’t seem to get away from her! This recipe was so simple and delicious.

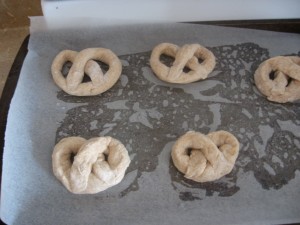
After you make the dough, let it rise and divide it into 10-12 equal parts.  Once divided,  roll each section into long snakes and make each snake into a U shape.
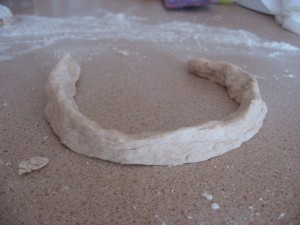
Bring each end of the U to the curved center to make a pretzel shape.  Repeat for each section of the dough.
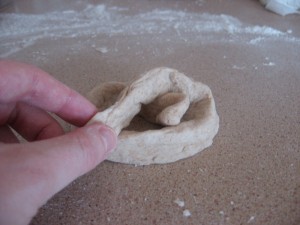
Place on a baking sheet line with parchment paper, allow the pretzels to rise for 20 mins.

Tip: Spray your baking sheet with a little cooking spray before lining with parchment–the paper will stick better!

While the pretzels rise, bring a large pot of water to a boil and add a few table spoons of baking powder.  It will get a quite bubbly at first, then it will die down.
This is where the fun begins.  Add a few of the pretzels to the boiling water and allow them to sit in the water for about 1 min each side.  Remove from the water with a slotted spoon and  transfer to a wire cooling rack allowing pretzels to “drip dry” . Repeat for all pretzels.

For the first batch, I kept the water at a rolling boil and this, my friends, was a mistake.  I had one pretzel casuality.  Lesson learned, keep the water at a low boil.   I don’t know why but the act of boiling the dough was so fun for me, I guess I am kind of a dork!

Place boiled pretzels on parchment lined baking sheets.  Sprinkle with coarse sea salt.  Personally, I love salt so I was pretty generous here, but use as much or as little as you feel comfortable with.  Cook at 475 degrees for about 12 mins.

I snagged a little piece of the wounded solider fresh out of the oven because I just couldn’t wait to try them.  All I have to say is the salty, doughy goodness was delicious and well worth the time it took!

Your possibilities are pretty endless when it comes to ways you can enjoy these soft pretzels.  Eat them plain or try dipping them in your favorite sauce!  This half of WCWWC is not as big of a sports fan as the other, however I always love the food that goes with sporting events.  Much like Catherine’s recent Game 2 post these would make an excellent Game 3 half time snack! BEAT LA!

Enjoy

Lizzie

Read Full Post »
As much as I enjoy cooking, it is no secret my true love in the kitchen is baking.  I usually try to take a bit more of a healthy approach (whole wheat flour, naturals sweatners like dried berries,yogurt instead of oil etc) , however with this recipe I through that mind-set out the window.  Sometimes life just calls for butter and lots of it!  I read about this cookies over at Pretty by the Bay, the simplicity of the recipe as well as a promise of a salty and sweet combo intrigued me.  This recipe is originally from Cook’s Illustrated I followed it almost exactly, except for 1/2 the batch I added a generous handful of dried cranberry, I guess I always feel the need to experiment and put my own personal touch on recipes!

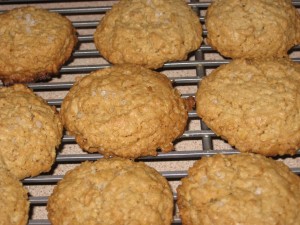
Using a cookie scoop (one of my favorite kitchen gadgets–no more messy hands from rolling cookie dough into balls) place 12 cookies on a cookie sheet sprayed with cooking spray.  Make sure there is enough room between each cookie, these spread out a bit.  This is where I need you to pay close attention as I almost skipped this step since it seemed a bit excessive.  Make sure to sprinkle the top of each cookie with 5-7 grains of course sea salt.  I know it seems a bit unnecessary but remember, we threw rational behavior out the window when we put almost TWO sticks of butter in to these most wonderful treats!

See that sea salt–mmmmmmmmm

Here are my thoughts on the taste.

The dough: wow not my proudest moment but I don’t regret sampling this raw egg goodness, delicious!

Cookies with cranberry: Pretty good but something just didn’t quit work, lesson learned

Original Cookies:Fresh out of the oven these were amazing, however I think I overcooked them a bit as they were a little to chrispy and hard for my liking the next day but still very tasty.

[L]

Read Full Post »