Feeds:
Posts
Comments

There’s been a lot going on here at this half of WCWWC, which partially explains why I haven’t posted in well over a month. One thing that has been keeping me away from the blog is that Andrew and I recently purchased a condo. Between moving, unpacking, and getting settled, our meals at home have been pretty simple and not that interesting. But the tides are turning my friends. We’re (somewhat) settled, I’ve got a wonderful new kitchen, and I am ready to cook again.

This past weekend, my parents came down to check out our new digs. Since the  purpose of their visit was to see our place, we opted to have lunch at our house versus eating out. The weather forecast was hot and humid, so I knew the meal should be light, refreshing, and easy.

Menu

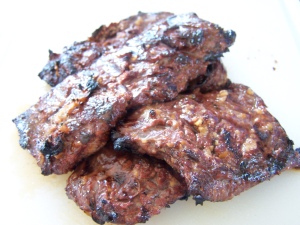
  • Grilled skirt steak
  • Salad with peas, scallions, feta, and lemon dressing
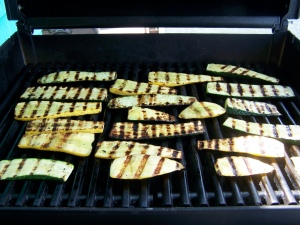
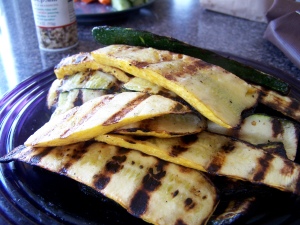
  • Grilled zucchini and summer squash

I’ll start with the steak.

Ingredients:

  • 1 skirt steak (approximately 1.25 lbs)
  • Juice of 2 limes
  • 2 Tbsp soy sauce
  • 2 scallions, finely sliced
  • 2 cloves garlic, minced
  • 1-inch knob of ginger, grated
  • Drizzle sesame oil
  • Dash of red pepper flakes

Directions:

Combine the last 5 ingredients in a bowl and whisk together. Score skirt steak in a criss-cross pattern with a knife. Combine steak and marinade in a gallon Ziploc bag for at least 3 hours and up to 24 hours, turning occasionally. Grill steak over high heat for five minutes on each side. Once you take the steak off the grill, let is rest for 5-10 minutes, then slice and serve. You may be tempted to skip this last step. Don’t. No matter how hungry you are. Letting the steak rest will insure a tasty, juicy piece of beef.

Honestly, I’m not a huge steak person. But if I am going to eat it, I like it well-marinated and hot off the grill.

Now, on to the salad. First things first, this was not my brainchild. My friend and former coworker had Andrew and I over for dinner a few weeks ago and made this salad. It was unbelievable; light, refreshing, and summery.  Here’s my take:

Ingredients:

  • 1 small head of butter lettuce
  • 1 small head of romaine lettuce
  • 1 cup frozen peas, thawed
  • 3 scallions, sliced thin
  • 1 block feta cheese, crumbled
  • Juice of one lemon
  • 1/4 cup olive oil
  • Salt and pepper

Directions:

Chop and wash lettuce. Combine lettuce in a large salad bowl with peas, scallions, and feta. In a smaller bowl, whisk the lemon juice, olive oil, salt and pepper together. Drizzle dressing over lettuce mixture and toss.

Finally, the zucchini and squash. This is a favorite of ours and we make it at least once a week. Best part is, it is super easy.

Ingredients:

  • 1 zucchini
  • 1 summer squash
  • Olive oil
  • Salt, pepper, and garlic powder

Directions: slice zucchini and squash lengthwise into 1/2 centimeter slices. Toss with a drizzle of olive oil and then add salt, pepper, and garlic powder to taste. Grill on medium high until the squash changes texture on top and has good grill marks on the bottom side. Flip the slices and grill for a few more minutes.

All together now!

Lizzie joined us for lunch and made an awesome dessert involving peaches and the grill. But that’s another post for another time…

This was a light and refreshing meal that we were all able to enjoy eating outside despite the hot and humid weather. It was very easy to put together and, if I do say so myself, had a touch of sophistication. Try this next time you need a light and tasty lunch or dinner for company.

{Catherine}

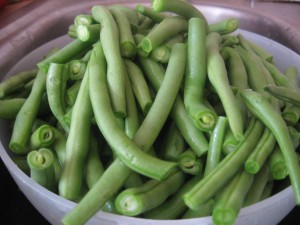
I have been craving green beans like crazy recently.  This craving was so intence that I actually dreamed of  making a cold green bean salad with a bittersweet vinaigrette dressing.  As weird as this was, I knew I had to make this salad of my dreams! 

What you will need: 

  • 3 lbs of fresh green beans
  • 1 can chickpeas
  • 1 white onion
  • 1 clove of garlic
  • sprinkle of sugar
  • 2 shakes of pepper
  • extra virgin olive oil
  • rice vinegar

Wash and trim the ends of your green beans.  This task was nothing short of boring and tedious.  Good think I had the Glee channel on Pandora playing in the background…. 


Bring a large pot of water to a rolling boil and add your green beans.  Let the beans cook for 3-4 minutes.  Drain the beans and then “shock” them by  placing them  in a large bowl filled with ice water.  Your beans will continue to cook after you remove them from the hot water. Shocking them with the cold water will slow the cooking process and prevent a mushy final product.   

ice, ice baby

While the beans cool, drain and rinse the can of chick peas and thinly slice your onion.  I used my mandolin because I wanted to get the thinnest slices possible.  I really do not like the taste of raw onion so I sautéed the onions in a frying pans with a little bit of oil and rice vinegar.  I probably only cooked them for 1-2 mins just to take the edge off. 

For the dressing, combine the following: 

  •  1/2 cup rice vinegar
  • a little less than 1/4 cup of EVOO
  •  1 clove crushed garlic
  • sprinkle of sugar
  • 2 shakes from the pepper shaker

As you know, we here at WCWWC are not the best at using exact measurements.  So do what feels right  and improvise with the above measurements.  . 

Once the dressing is complete, mix all the ingredients and allow the flavors to meld together for about 2 hours.  Much like the cous cous salad, you could make this a day in advance without issue.  The picture below does not do justice to how tasty this salad was.  I even ate the leftovers for three days and didn’t get sick of it! 

Don't judge a book by its cover

What is your favorite summer salad? 

Enjoy! 

[Lizzie]

Israeli couscous is a wheat based pasta that is most commonly produced in a pearl shape–a bit larger than traditional couscous.  My cousin recently served a cold israeli couscous salad at her wedding, this coupled with my basil plant being in full bloom gave me the inspiration for this dish. 

Israeli Couscous Pesto Salad

  • Pesto (homemade or store-bought)
  • 1 box Israeli Couscous
  • 2 ears of fresh corn
  • 1 red onion
  • Cherry tomatoes

I chose to make homemade pesto, since I had a large supply of basil in my own backyard as well as time on my hands–although making pesto is a fast process. I roasted 4 cloves of garlic and combined it with basil, olive oil and parmesan cheese in my Cuisinart and mixed until it reach the right consistency.  I added more olive oil until it was adequately “thinned” out. 

  • Cook the couscous according to the instructions on the box. 
  •  While the couscous is cookingm in a separate pot boil the ears of corn for about 10 mins.  Remove from water allowing to cool.  After the corn has cooled, take a knife and run it down the side of the corn removing all of the kernels.

  • Chop onion and cut the cherry tomatoes in half
  • Combine all ingredients and allow to chill in the refrigerator for at least two hours before serving.  I made this a day in advance so that all of the flavors could really melt together.  If you do this, I suggest not adding the tomatoes until a few hours before you serve so that they don’t get soggy.

Enjoy!

[Lizzie]

My girlfriends and I affectionately refer to ourselves as the BCG+V (Broad Cove Girls and Val).  We have all been friends since elementary school and although we often go long periods of time without seeing each other, when we get together it is as if no time has passed.  Most of us were in town for our friends Eliza and Scott’s wedding so we decided to all get together for dinner.  All of our parents ended up joining and, needless to say, we all had a blast.  Okay now onto the food. 

The menu 

Appetizer: 

  • Guacamole and chips
  • Mediterranean platter (courtesy of Val)
  • Spicy Southwest dip (courtesy of Pat)

Dinner: 

  • Broco-slaw
  • Pulled pork
  • Green Salad
  • Grilled Pizzas


Dessert: 

  • Lemon pound cake with freshly picked berries (courtesy of Val)

Although there are so many yummy and wonderful dishes to pick from, I decided to focus on how to make grilled pizza for this post. 

This probably is nothing new, but my number one trick when having people over for dinner is to prepare as much as possible before your guest arrive.  You will have a lot more fun and be a lot less stressed out. 

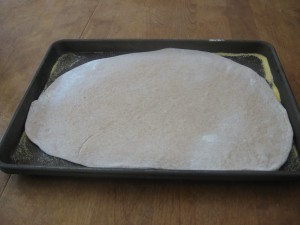
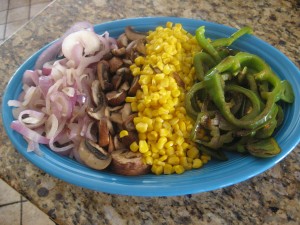
When making grilled pizzas you have to act pretty fast and it certainly is a two person job.  I pre-cooked all of the toppings and rolled out the dough so that I could enjoy the appetizer time and when I needed to start cooking I could be ready to move fast.  


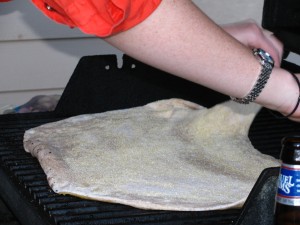
When it comes time to cook your pizzas make sure you grab a friend!   Turn on the grill so it warms up nicely and brush one side of the dough with olive oil. 


Place the dough onto the grill and cook until golden brown. Cook with the heat on medium.  (I made the mistake of cooking on high heat and burnt the first one a bit!)   While the dough is cooking, brush the top side of the dough with oil to prep for when you flip the dough.  


Once you flip the dough he need to move fast placing all of your toppings so that everything can get warm and the cheese will melt before you over cook the other side of the dough.  We shut the lid for this portion of the cooking so that the heat would be trapped in, aiding in the warming and melting process.  Let cook until the dough is crispy and golden. 

Allow the pizzas to sit for a few minutes then cut and serve.  I promise these will be a big hit! 

Pesto, tomatoes, red onion and fresh mozzarella


red sauce, mushrooms, corn, green pepper and cheese


[Lizzie] 

The following post is brought to you by my wonderful co-worker Jon.  Thank you for taking the time to write such a great post Jon–next time you should invite me over for dinner!

Over the weekend I had 7 friends over, mostly from my UCLA days, who now live in LA, New York, and Boston. With my 2 roommates, a 10-person dinner meant I needed to make a balanced meal with big time flavors, fresh ingredients, and a variety of proteins (and not to mention a whipped up vegetarian pasta dish for one person).

A friend of mine, who recently moved back to California after graduating from Harvard Law, loved spending his last weeks taking a variety of family and friends, including me, to Toro, where we frequented the fantastic Paella. Eating it so much made me realize that the ingredients, although plentiful, are neither too exotic or unique that I couldn’t try it at home.

So with about 2 hours from prep to table, I decided on the following dinner menu (with the help of some crème fraiche, fresh fruit, and a Petsi’s Fruit Cobbler)

  • Arugula and Heirloom Cherry Tomato on Toasted Baguette
  • Pear Goat Cheese Walnut and Cranberry Mixed Greens with Balsamic Vinegar
  • Two 1.5lb Steamed Maine Lobsters
  • Paella


The Arugula

The Arugula Heirloom Tomato recipe came from a botched attempt at making pesto, but is such a great balance of bitter Arugula with salt and the juicy tomatoes on crisp toast.

What you’ll need:

  • 1 bag of TJ’s Arugula
  • Half of a box of TJ Heirloom Cherry Tomatoes (regular works fine)
  • A good amount of salt (to cut the bitter taste of Arugula)
  • Olive Oil

The key to this is to chop the Arugula finely so that you get a pesto-like texture. Mix in a heavy hand of olive oil as well, a heavy hand of salt to taste, and halved tomatoes. Serve on toasted baguette. Feel free to add some garlic powder (I like the powder because it dissolves easier without changing the texture of the dish).

The Salad

A really great texture salad that has sweet and salty profiles – I literally can eat this with every meal.

What you’ll need:

  • 1 bag of TJ’s Sorrento Mix (Baby Spinach and Arugula)
  • 1 shotglass of chopped walnuts
  • 1 shotglass of dried cranberry
  • 1 Bosc Pear
  • 2/3 cup crumbled goat cheese
  • Balsamic Vinegar & Olive Oil to taste


The key is to find sweet Bosc Pears and chop them, not too finely, so that you can really get that surprise sweet texture in the salad. The goat cheese adds a great element to counter the crunchy pear. Adding walnuts and cranberry just gives a good sweet and salty mix that finishes it all off. Add balsamic vinegar and olive oil dressing just enough to add moisture to the salad, but trust me, the flavor is already bursting.

The Lobsters

Just steam ‘em and crack them for your guests to take apart with your hands.

The Paella

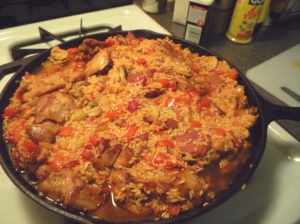
I used a hybrid recipe from America’s Test Kitchen, Epicurious, and Mark Bittman’s How to Cook Everything and came up with this version. Because Saffron is pretty expensive, I decided to substitute a combination of Paprika and Tumeric, which I think worked pretty well except I could have used more, as some of the rice in the bottom center of the skillet tasted more like Spanish rice. Some other take aways: I wish I had a larger pan, I went with a 10” cast iron skillet; for the amount of people I was cooking for, a traditional 14” paella pan, or just a larger cast iron would have made the flavor spread out a lot better. I also would have added frozen peas and corn, but the pan just would have exploded with too much stuff. Thinking back, I also wished I had seasoned the shrimp a bit more, but one could also do a sauté with garlic on the side then top the paella.  To avoid crispy rice mixed in, you could also cook the whole thing with a lid (like a dutch oven), or just cover it in foil.

What you’ll need:

  • 2.5 cups of long grain white rice (or paella rice if you can find it)
  • 4 cups of chicken stock
  • ¼ teaspoon of tumeric (don’t be afraid to add more)
  • ¼ teaspoon of paprika (don’t be afraid to add more)
  • 2 Bell Peppers (Red or Orange)
  • 1 whole garlic cove (diced and crushed)
  • 2 shallots
  • 1 yellow onion
  • Half box of TJ’s Cremini Mushrooms (chopped)
  • 1.5 lbs of Chicken Thighs
  • 1lb of chorizo or Portuguese sausage (any spicy sausage will work) sliced
  • 1 lb of de veined skin on tiger shrimp
  • Chopped Parsley
  • 2 lemons


Trim & cut the chicken thighs into thirds, add olive oil, salt and pepper, oregano, rosemary, crushed garlic, and some paprika. Brown the chicken in a pan, drain the fat, and set aside. In the skillet / paella pan, add butter, olive oil, the shallots, onion, chorizo, and mushroom and cook until the mushrooms are translucent. Add the bell peppers and sautee (adding oil as needed) until most of the liquid is almost burned off. In a separate pot, simmer 4 cups (2 cans) of chicken broth and the tumeric / paprika mixture, keeping it warm. Add the rice slowly into the skillet with the veggie mixture and brown the rice briefly, adding the chicken into the mixture and lowering the heat. When the rice is browned add the broth mixture until the rice is submerged and bake for 40 minutes at 400 degrees, while adding the broth mixture whenever the paella looks dry DO NOT STIR, this is NOT a risotto. At this point, the rice should be crisp on the tops, but almost done underneath.

At this point, take out the paella, check that the rice is almost done under the crisp outer layer, and stir everything up. Flatten out the paella again, and add the shrimp on top (or mixed if you prefer). Bake for another 10 minutes or so, or until the rice is done. The key is to really add your seafood, whether it be shrimp or mussels, at the very end because they tend to cook VERY quickly. Like I said, in hindsight I wish I had marinated or dry rubbed the shrimp, or even possibly cooked the shrimp separately in a garlic sauce and served them on top of the paella when it was done.

Sprinkle chopped parsley and a heavy dose of squeezed lemon for garnish. Dig in and enjoy. Best with prosecco or sparkling white wine, preferably served in a Porron.

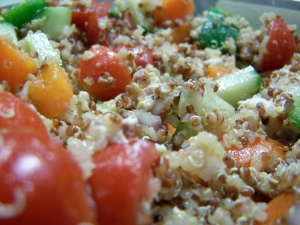
I originally made this as a side dish for a pre-Memorial Day BBQ Andrew and I hosted when we were visiting his family in South Jersey. I used brown rice for that version, and it was so tasty I couldn’t wait to make it again back at home. I made a big batch this week and took it to work for lunch. Since I would be eating this on its own, I wanted a grain with a little more staying power. I chose quinoa.

Have you heard of quinoa? Up until a year ago, neither had I. While it often functions as a grain in recipes, quinoa is actually a relative of leafy green vegetables like spinach and Swiss chard. Quinoa packs a serious punch of vegetarian protein, making it a great choice for this lunchtime salad.  That said, you could make this recipe using any grain you would like–brown rice, white rice, millet, cous cous, bulger, etc.

Ingredients:

  • 3 cups cooked quinoa (or grain of your choice)
  • Half an English cucumber, chopped
  • 1/4 red onion, chopped
  • 1 orange pepper, chopped
  • 15-20 grape tomatoes, halved
  • 2 ounces goat cheese, crumbled
  • 2 Tbs olive oil
  • 2 Tbs red wine vinegar
  • 1 Tbs Dijon mustard
  • Salt and pepper to taste

Directions:

Mix first 5 ingredients (quinoa through goat cheese) in a large bowl. In a small bowl, whisk olive oil, vinegar, Dijon mustard, and salt and pepper. Allow flavors to combine at least 1 hour before serving.

Have you ever tried quinoa?

{Catherine}
After three days of eating work provided meals and indulging at the Scooper Bowl I was craving something clean and fresh.  I knew I wanted some vegetables and beans.  After a quick stop at Whole Foods I created a simple, clean and fresh meal.  It was so good that I ate it both for lunch and dinner.  A whole can of chickpeas in one day?  No big deal.

Chickpea Patties

  • 1 can chickpeas, rinsed
  • Juice of 1 lemon
  • 3 tbls flax-seed


In your Cuisinart combine the above ingredients and chop until the mixture is smoother than it is chunky.  Using your hands, form 6 patties.  In your favorite non-stick frying pan heat up some extra virgin olive oil and lightly pan sear the patties, about 2 mins each side. 

While patties are cooking slice a tomato and avocado.  Remove patties from the frying pan and place on your plate.  Top with sliced tomato and avocado.  I suggest adding a drizzle of extra virgin olive oil as well as a sprinkle of sea salt and pepper.

These patties make the perfect lunch.  Individually they would make great appetizers!

Enjoy

Lizzie

Soft Pretzels

On a recent trip to NYC my cousin proclaimed that she had to have a pretzel from a street vendor.  I encouraged her to go for it,  knowing that I would be able to sample it for myself.  I had forgotten just how good soft pretzels taste.  That was it. I decided I would have to try making these on my own.  After taking a few weeks to read different recipes, I decided to use one that took a classic approach; boiling the pretzels before cooking them in the oven.

I used this recipe, Another Martha Stewart recipe, I just can’t seem to get away from her! This recipe was so simple and delicious.

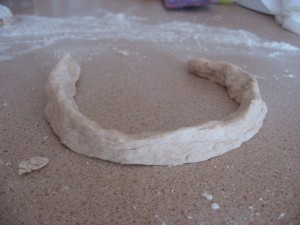
After you make the dough, let it rise and divide it into 10-12 equal parts.  Once divided,  roll each section into long snakes and make each snake into a U shape.

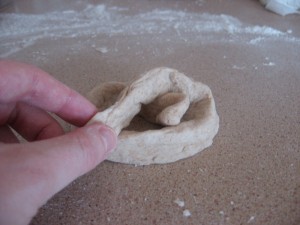
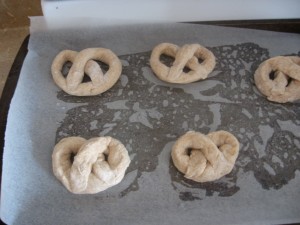
Bring each end of the U to the curved center to make a pretzel shape.  Repeat for each section of the dough.

Place on a baking sheet line with parchment paper, allow the pretzels to rise for 20 mins.

Tip: Spray your baking sheet with a little cooking spray before lining with parchment–the paper will stick better!

While the pretzels rise, bring a large pot of water to a boil and add a few table spoons of baking powder.  It will get a quite bubbly at first, then it will die down.

This is where the fun begins.  Add a few of the pretzels to the boiling water and allow them to sit in the water for about 1 min each side.  Remove from the water with a slotted spoon and  transfer to a wire cooling rack allowing pretzels to “drip dry” . Repeat for all pretzels.

For the first batch, I kept the water at a rolling boil and this, my friends, was a mistake.  I had one pretzel casuality.  Lesson learned, keep the water at a low boil.   I don’t know why but the act of boiling the dough was so fun for me, I guess I am kind of a dork!

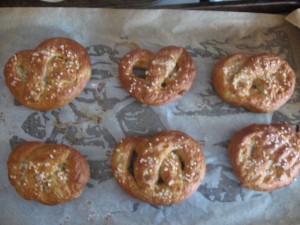
Place boiled pretzels on parchment lined baking sheets.  Sprinkle with coarse sea salt.  Personally, I love salt so I was pretty generous here, but use as much or as little as you feel comfortable with.  Cook at 475 degrees for about 12 mins.

I snagged a little piece of the wounded solider fresh out of the oven because I just couldn’t wait to try them.  All I have to say is the salty, doughy goodness was delicious and well worth the time it took!

Your possibilities are pretty endless when it comes to ways you can enjoy these soft pretzels.  Eat them plain or try dipping them in your favorite sauce!  This half of WCWWC is not as big of a sports fan as the other, however I always love the food that goes with sporting events.  Much like Catherine’s recent Game 2 post these would make an excellent Game 3 half time snack! BEAT LA!

Enjoy

Lizzie