Feeds:
Posts
Comments

Posts Tagged ‘dinner party’

For many years my parents neighbor would bring these delicious cookies over for a treat.  It took me years to think to ask for the recipe.  I am so happy I finally did!  I  love these cookies because they are chewy and spicy.  So much fun.  Not to mention they are very easy to make and always a crowd pleaser.

Here is what you need:

  • 3/4 of a cup of butter
  • 1 cup sugar
  • 2 eggs
  • 1/2 cup Molasses
  • 2 teaspoons vinegar
  • 3 and 3/4 cups flour
  • 1 and 1/2 teaspoons baking soda
  • 4 rounded teaspoons ginger
  • 1 teaspoon cinnamon
  • 1/2 teaspoon nutmeg
  • 1/2 teaspoon cloves
  • 2 teaspoons crystalized

Cream together butter and sugar mixed in beaten eggs, molasses and vinegar.  Next combine flour, baking soda and spices (including crystalized ginger) 

Tip: Spray your measuring cup with cooking spray prior to measuring molasses.  This will prevent your molasses from sticking to the measuring cup and you from talking to inanimate objects!  You know you do that sometimes too!

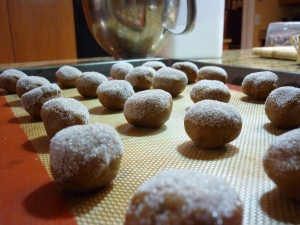
After everything is mixed together, chill the dough for about 30 minutes.  Roll dough into 1 inch balls and cover in sugar. 

Snow capped cookies!

Place on baking sheet and cook for 8-10 minutes at 350 degrees.  Allow to cool and enjoy!

Chewy goodness

Chewy goodness


These make excellent treats for friends and neighbors!  Or pair them with my new favorite libation—Harpoon Winter Warmer!

Cheers to winter!

Happy Holidays!

[L]

Read Full Post »

As Catherine mentioned in her latest post, we spent a wonderful Saturday lunch with our parents at her and Andrew’s new condo. I wanted to make a contribution to the meal, so Catherine asked if I would bring a dessert. Desserts can be tricky at lunchtime in the summer because you really don’t want something that will weigh you down. And, honestly, I really wanted to take advantage of C&A’s grill. The decision was made: Grilled peaches.

What you will need:

  • 4 peaches
  • 24 oz container of Greek yogurt
  • 1 pint blueberries
  • Cinnamon
  • Honey
  • Extra Virgin Olive Oil

Cut the peaches in half from top to bottom and remove the pit. This was a lot more difficult than I anticipated–I figured it would be like removing the pit from an avocado but it was actually a lot more difficult. After a little bit of muscle I was able to remove the pit!

Brush the peach halves with olive oil and place face down on your grill. The grill should be heated to a medium temperature. Cook the peaches for about 10-15 minutes until they get beautiful grill marks and warm through the center. The timing will most likely depend on the ripeness of your fruit. The less ripe your fruit, the more cooking time it will need.

Once done cooking, remove from the grill.You could enjoy these as is, but I chose to add some toppings. I sprinkled each peach half with a bit of Cinnamon, a dollop of Greek yogurt, a drizzle of honey, and a handful of blueberries followed by one more sprinkle of cinnamon for good measure.

The warm sweet peaches combined with the creamy Greek yogurt made these taste a lot more decadent than they were–dare I say it tasted just like a peach cobbler.

Lizzie

Read Full Post »

I have been craving green beans like crazy recently.  This craving was so intence that I actually dreamed of  making a cold green bean salad with a bittersweet vinaigrette dressing.  As weird as this was, I knew I had to make this salad of my dreams! 

What you will need: 

  • 3 lbs of fresh green beans
  • 1 can chickpeas
  • 1 white onion
  • 1 clove of garlic
  • sprinkle of sugar
  • 2 shakes of pepper
  • extra virgin olive oil
  • rice vinegar

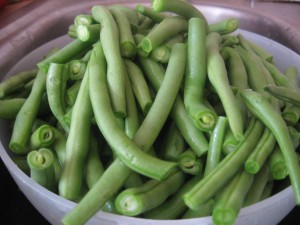
Wash and trim the ends of your green beans.  This task was nothing short of boring and tedious.  Good think I had the Glee channel on Pandora playing in the background…. 


Bring a large pot of water to a rolling boil and add your green beans.  Let the beans cook for 3-4 minutes.  Drain the beans and then “shock” them by  placing them  in a large bowl filled with ice water.  Your beans will continue to cook after you remove them from the hot water. Shocking them with the cold water will slow the cooking process and prevent a mushy final product.   

ice, ice baby

While the beans cool, drain and rinse the can of chick peas and thinly slice your onion.  I used my mandolin because I wanted to get the thinnest slices possible.  I really do not like the taste of raw onion so I sautéed the onions in a frying pans with a little bit of oil and rice vinegar.  I probably only cooked them for 1-2 mins just to take the edge off. 

For the dressing, combine the following: 

  •  1/2 cup rice vinegar
  • a little less than 1/4 cup of EVOO
  •  1 clove crushed garlic
  • sprinkle of sugar
  • 2 shakes from the pepper shaker

As you know, we here at WCWWC are not the best at using exact measurements.  So do what feels right  and improvise with the above measurements.  . 

Once the dressing is complete, mix all the ingredients and allow the flavors to meld together for about 2 hours.  Much like the cous cous salad, you could make this a day in advance without issue.  The picture below does not do justice to how tasty this salad was.  I even ate the leftovers for three days and didn’t get sick of it! 

Don't judge a book by its cover

What is your favorite summer salad? 

Enjoy! 

[Lizzie]

Read Full Post »

My girlfriends and I affectionately refer to ourselves as the BCG+V (Broad Cove Girls and Val).  We have all been friends since elementary school and although we often go long periods of time without seeing each other, when we get together it is as if no time has passed.  Most of us were in town for our friends Eliza and Scott’s wedding so we decided to all get together for dinner.  All of our parents ended up joining and, needless to say, we all had a blast.  Okay now onto the food. 

The menu 

Appetizer: 

  • Guacamole and chips
  • Mediterranean platter (courtesy of Val)
  • Spicy Southwest dip (courtesy of Pat)

Dinner: 

  • Broco-slaw
  • Pulled pork
  • Green Salad
  • Grilled Pizzas


Dessert: 

  • Lemon pound cake with freshly picked berries (courtesy of Val)

Although there are so many yummy and wonderful dishes to pick from, I decided to focus on how to make grilled pizza for this post. 

This probably is nothing new, but my number one trick when having people over for dinner is to prepare as much as possible before your guest arrive.  You will have a lot more fun and be a lot less stressed out. 

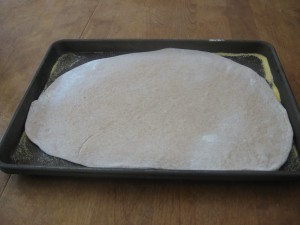
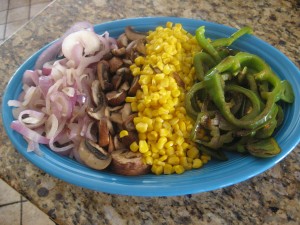
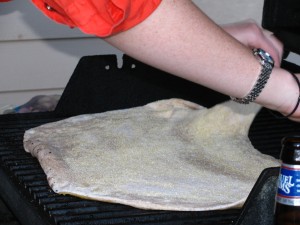
When making grilled pizzas you have to act pretty fast and it certainly is a two person job.  I pre-cooked all of the toppings and rolled out the dough so that I could enjoy the appetizer time and when I needed to start cooking I could be ready to move fast.  


When it comes time to cook your pizzas make sure you grab a friend!   Turn on the grill so it warms up nicely and brush one side of the dough with olive oil. 


Place the dough onto the grill and cook until golden brown. Cook with the heat on medium.  (I made the mistake of cooking on high heat and burnt the first one a bit!)   While the dough is cooking, brush the top side of the dough with oil to prep for when you flip the dough.  


Once you flip the dough he need to move fast placing all of your toppings so that everything can get warm and the cheese will melt before you over cook the other side of the dough.  We shut the lid for this portion of the cooking so that the heat would be trapped in, aiding in the warming and melting process.  Let cook until the dough is crispy and golden. 

Allow the pizzas to sit for a few minutes then cut and serve.  I promise these will be a big hit! 

Pesto, tomatoes, red onion and fresh mozzarella


red sauce, mushrooms, corn, green pepper and cheese


[Lizzie] 

Read Full Post »

Chicken Marbella is what you might call a modern classic, made famous in Sheila Lukins’  Silver Palate Cookbook. Seriously, google it.  You’ll find countless missives that describe the recipe much more eloquently than I will. In short this recipe is great because its easy, affordable, unique, and elegant. When Andrew and I decided to have a few friends over for dinner last weekend, I knew this would be the perfect meal to serve.

I’ve actually known about this dish as long as I remember. If a family member or friend was ever sick, injured, or grieving, my mom would always cook a meal for them and their family. Chicken Marbella was (and, for that matter, still is) one of her go-to meals for these occasions. She’d always make a large batch and save some for our family. The dish became affectionately known as “Chicken Miserable”-if we saw Chicken Marbella in the fridge, we knew something was wrong. All jokes aside, there is a reason this recipe worked so well. Although the ingredients are some what unique, it is essentially roast chicken–a classic comfort food. Furthermore, it reheats wonderfully and is even great at room temperature.

I actually don’t own the Silver Palate Cookbook, but you can find the recipe all over the internet. I followed this version. My only change is that I added apricots and forgot the parsley.

To start, gather your ingredients:

I supplemented a whole cut up chicken with a package of chicken thighs.  This served six people with some leftovers. Most stores will sell a cut-up whole chicken, but you could always try it yourself. Here is a great tutorial if you’re feeling hardcore.

The next step is to marinate your chicken with the fruit, olive oil, capers, vinegar, and garlic.

If i had my act together, I would have marinated this over night. I would guess this marinated for about 4 hours and there were no complaints. Once you are about an hour and half away from when you’d like to serve dinner, preheat the oven to 350 and arrange the chicken piece on a shallow baking dish. I used one cookie sheet and one casserole dish, because that is what I have. Distribute the olives, fruit, capers, and remaining marinade evenly. Sprinkle each piece of chicken with brown sugar and pour white wine around chicken pieces.

Bake the chicken for about an hour, basting every 10 minutes or so.

And that’s about all there is to it. It takes about an hour to cook. You can use a meat thermometer to make sure it is done or just cut into a thigh piece–if the juices run clear, you are good to go. I recommend letting the chicken rest for 5 minutes before serving. This ensures that the chicken stays nice and juicy.

We made my future mother-in-law’s cucumber and onion salad as an a side dish. To make, slice onions, cucumbers, and green peppers as this as you can. Add a generous amount of salt and let sit for an hour or so. Then mix in a couple tablespoons of sugar and 1/2 cup white (I used white balsamic) vinegar. Her recipe calls for letting it set for a day. I let it sit for about an hour outside of the fridge and the results were delicious.


A cozy dinner for six around our little table:

For dessert, our friend Sean made an amazing apple crisp that he served with vanilla ice cream. I stupidly neglected to take a picture, but I bet I could convince him to make it again if the readers demand it.

One last note, although the recipe is easy, it does involve some time marinading and some tending to in the oven. My mom would sometimes avoid this by putting all the ingredients in a Crock Pot (if you use this approach, sub cut up boneless chicken breasts and thighs for bone-in chicken) and letting it cook for 6 to 8 hours. The results are more stew-like, but the flavors are still there.

{c}

Read Full Post »